Fb galaxy gp

Identify TCGA data that have specific mutational profiles

Added by GenomeSpaceTeam on 2016.04.26 Official logo
Last updated on over 3 years ago.


Summary

How do I obtain and analyze data from The Cancer Genome Atlas (TCGA)? Which TCGA datasets have specific mutations in my gene of interest?

This recipe provides a method for identifying and obtaining specific datasets of interest from The Cancer Genome Atlas (TCGA), through a web-based tool called FireBrowse. An example use of this recipe is a case where an investigator may have a gene they are interested in, such as ERCC2, and would like to know if there are mutations in this gene in specific datasets of interest, such as bladder cancer.


Tumors arise from mutational changes to healthy cells, and are frequently deficient in one or more DNA repair pathways. The accumulation of mutations in tumor can be described by the “mutational signature”, a pattern of genetic mutations found in tumor DNA, which reflect different mutation events. Mutational signatures can be specific to certain tissues or cancer types. Many of these mutational signatures are associated with DNA repair pathways.

An in-depth study of urothelial carcinoma, which causes ~150,000 deaths annually, by Kim et al. (Nature Genetics, 2016) has identified a mutational signature in bladder cancer involving the nucleotide-excision repair (NER) pathway. Kim et al. identified a mutational signature involving ERCC2, a gene encoding a DNA helicase which plays a critical role in the NER pathway. Somatic mutations in this gene may prevent proper functioning of the NER pathway, allowing mutations to accumulate. Uniquely, urothelial cancer is the only known tumor type to date in which ERCC2 is significantly mutated.

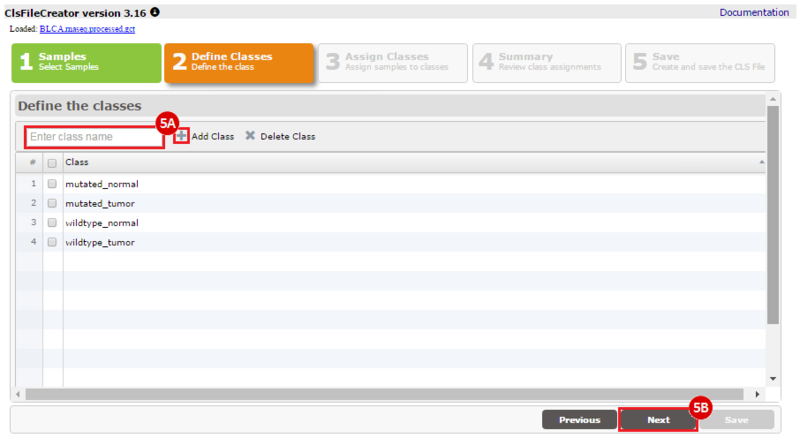
Kim et al. used the collection of bladder carcinoma (BLCA) samples in The Cancer Genome Atlas (TCGA) to complete their analysis. Data were downloaded from the Broad Institute TCGA Genome Data Analysis Center, and samples were categorized based on mutational status. Tumors with somatic, missense mutations in ERCC2 were compared to non-mutated (wild-type) samples to identify the comprehensive mutational landscape of bladder cancer (also described in this TCGA paper).

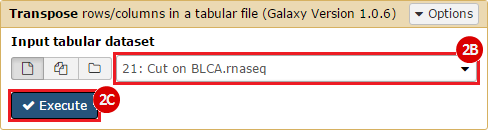
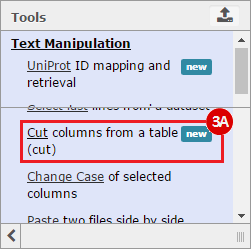
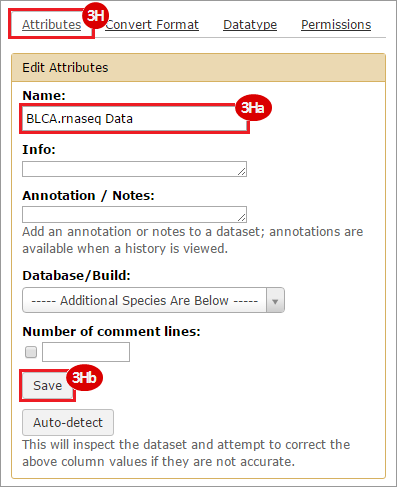
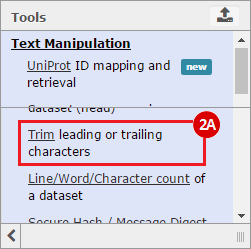
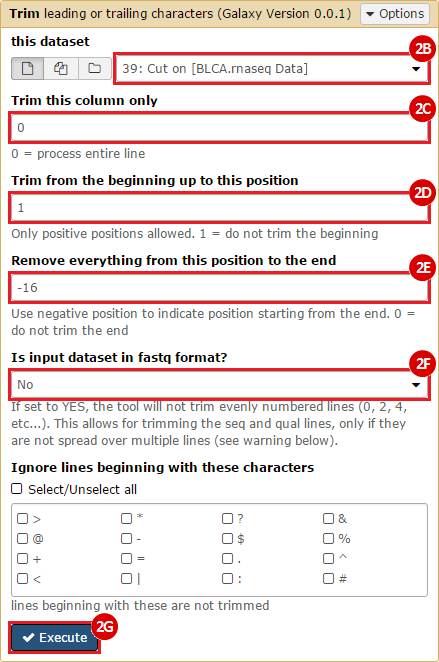
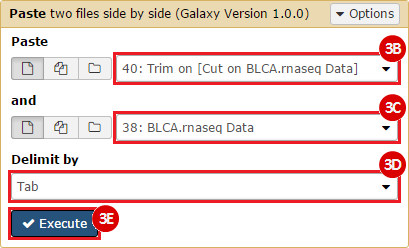
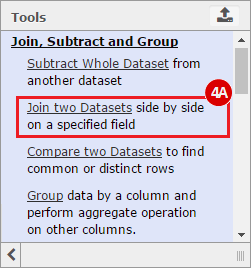
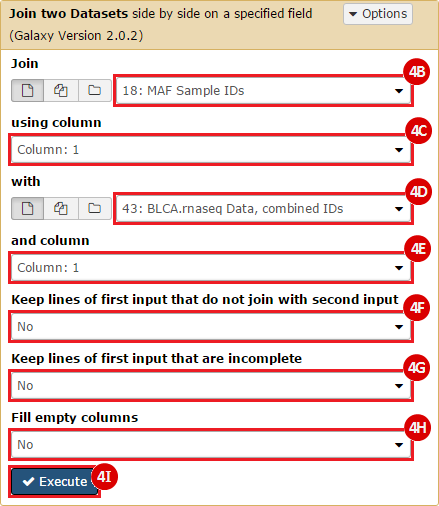
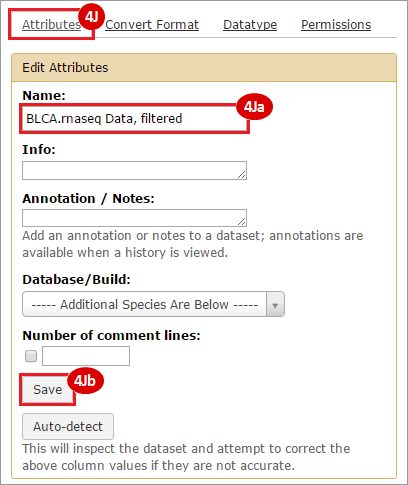
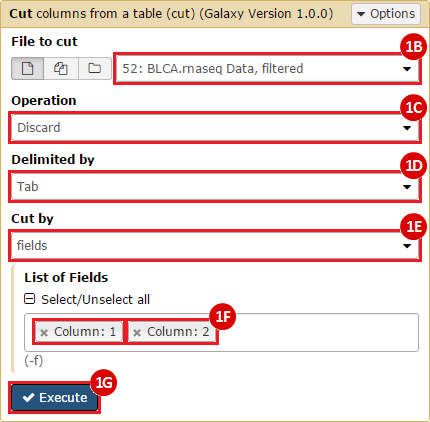
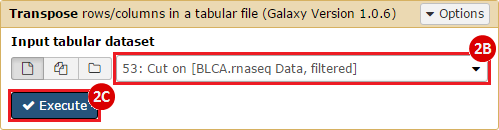
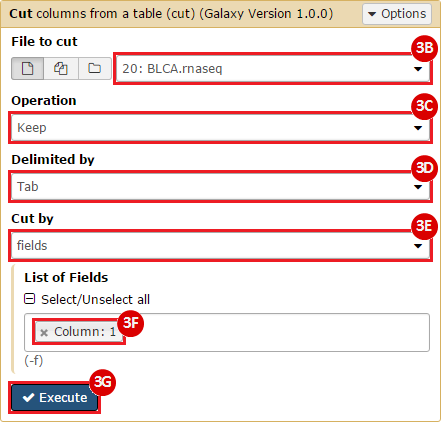
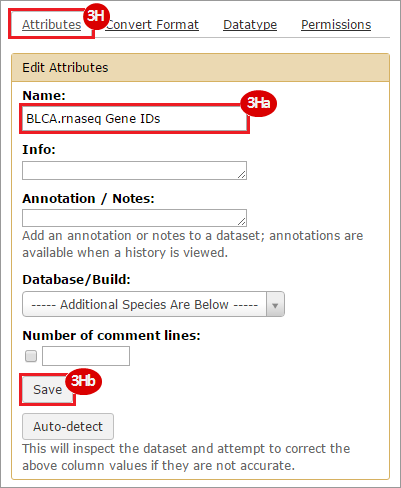
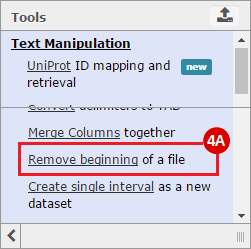
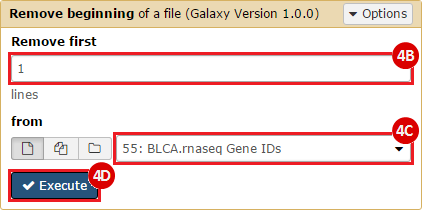
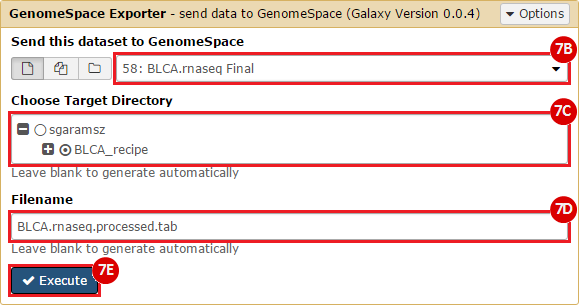
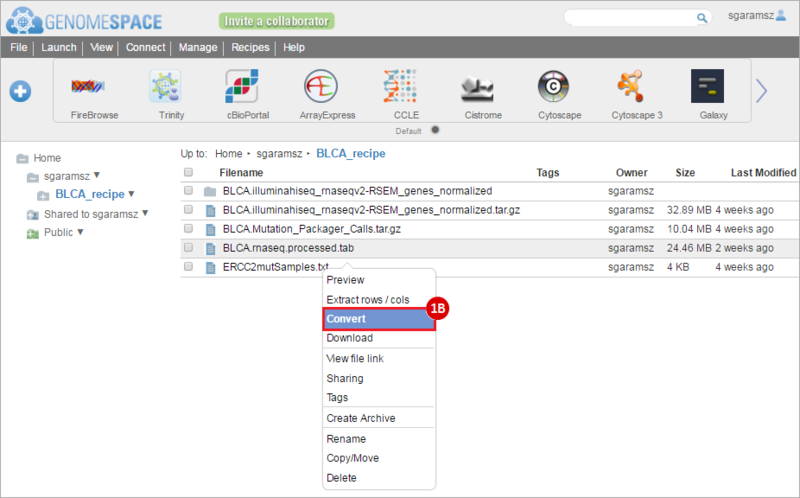
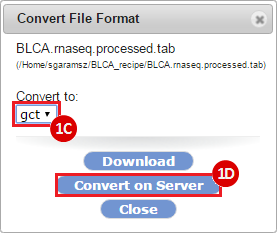
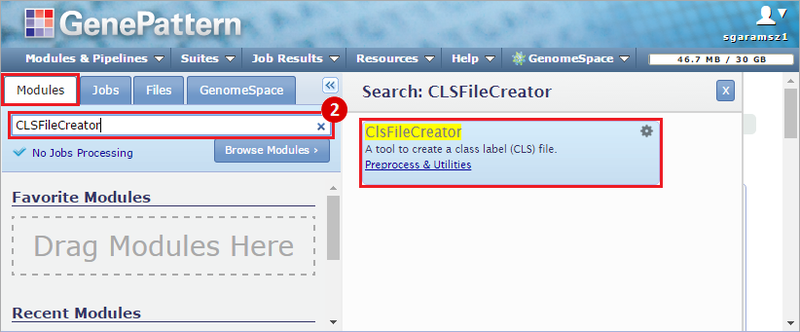
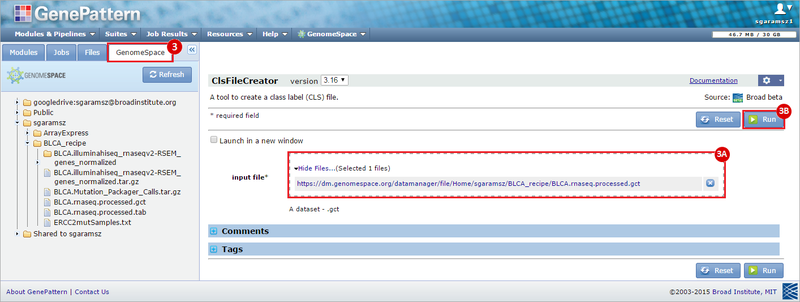
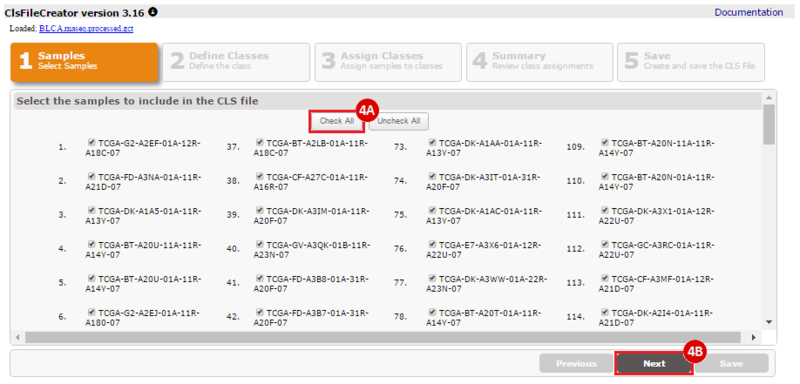
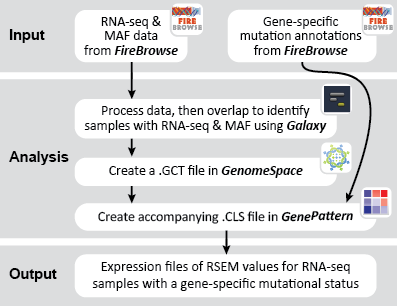
This recipe provides a method for processing data from The Cancer Genome Atlas (TCGA), to identify samples which have mutations in specific genes. The purpose of this recipe is to categorize data by mutational status, for further downstream analysis (e.g. comparing tumors of different mutational status, etc.). Data is collected from FireBrowse; Galaxy and GenePattern are used to categorize samples by mutational status and generate GCT and CLS files. The RNA-seq datasets are gene-level normalized RSEM expression estimates.


TCGA Barcodes

The Cancer Genome Atlas labels its datasets with the TCGA barcode, an identifer that describes the metadata associated with sample. You can learn more about the TCGA Barcodes on the NIH National Cancer Institute Wiki page (see also: working with TCGA data).

TCGA barcodes adhere to a certain format: TCGA-00-1111-22A-33B-4444-55. For this recipe, we are interested in the Sample type, indicated by the 22A section of the barcode. For this recipe we are interested in samples with designation 01 (solid tumor, or TP) or 11 (solid tissue normal, or NT), which are paired tumor-normal samples.

Inputs

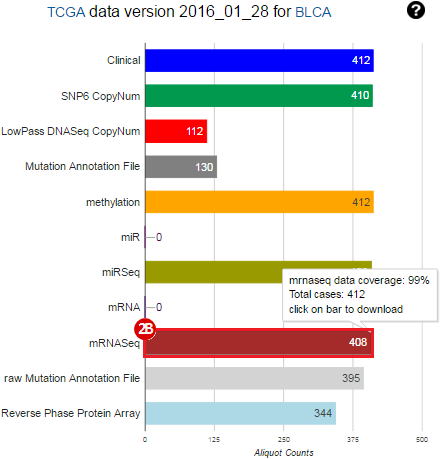
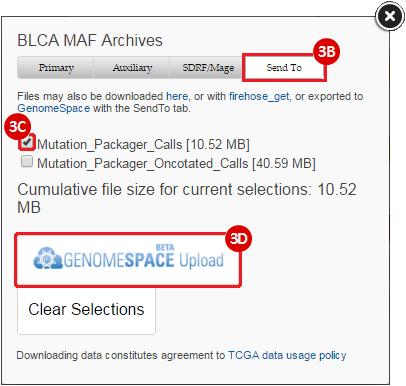
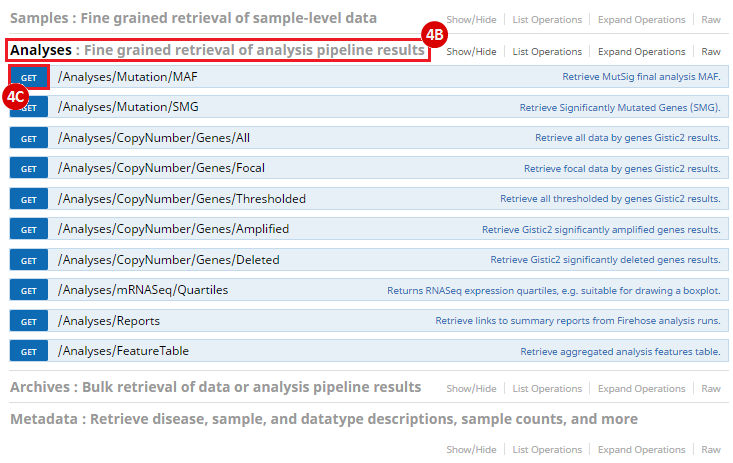
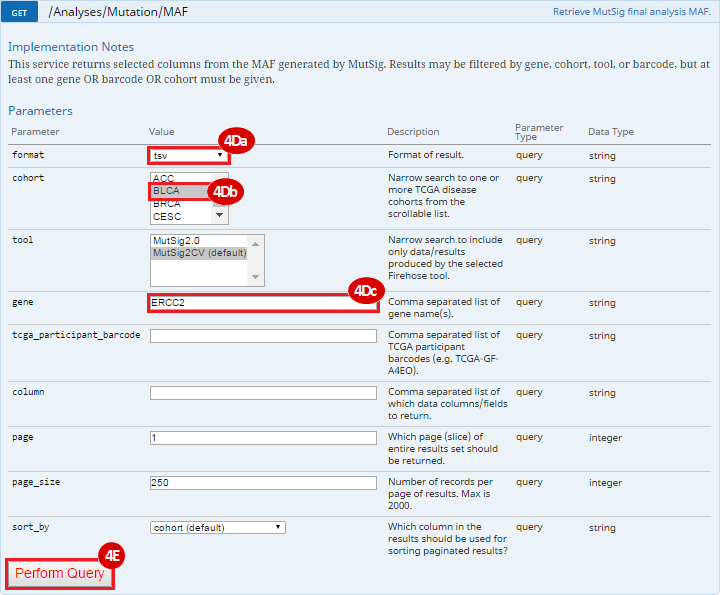
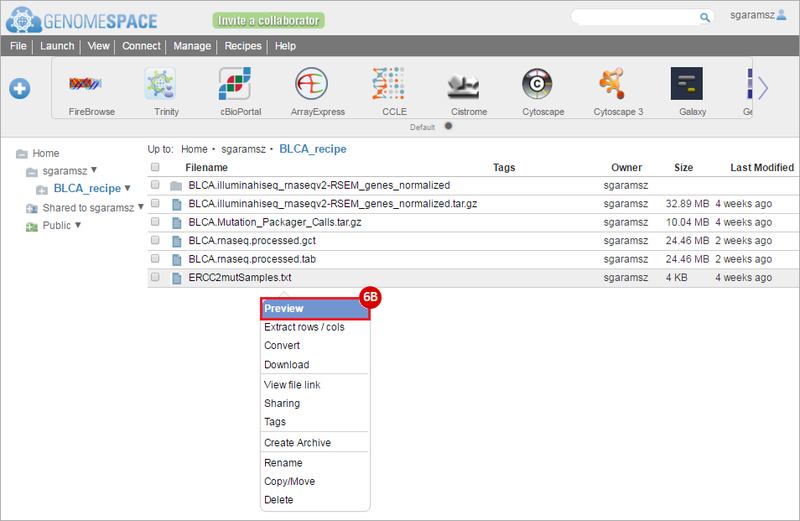
To complete this recipe, we will need several datasets. First, we need example Bladder Cancer (BLCA) data from RNA-seq reads which have been processed and had normalized RSEM values calculated for each gene. In this dataset, we should have bladder cancer tumor samples, in addition to paired normal tissue. For this recipe we are trying to identify the bladder cancer samples that have mutations in the gene ERCC2. Therefore, we also need a list of which samples in the RNA-seq data have mutation annotation files (MAFs), and additionally we need to identify the list of bladder cancer samples that have ERCC2 mutations. We will be using the following datasets, which we will obtain from FireBrowse:

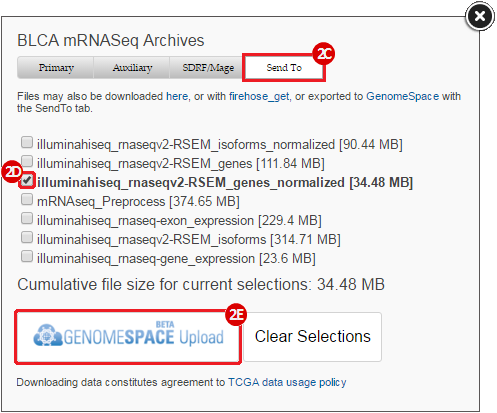
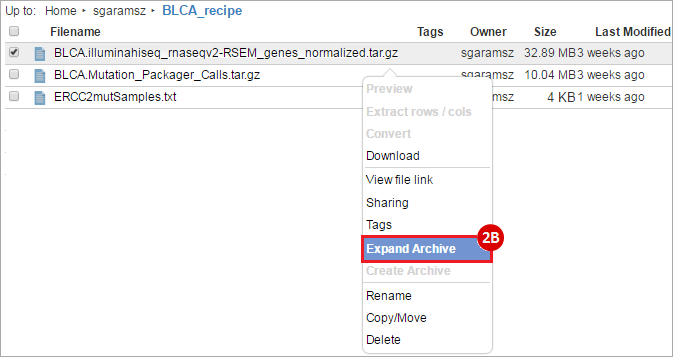
BLCA.illuminahiseq_rnaseqv2-RSEM_genes_normalized.tar.gz: This is a zipped file containing the normalized RSEM values for bladder cancer Illumina hi-seq RNA-seq data.

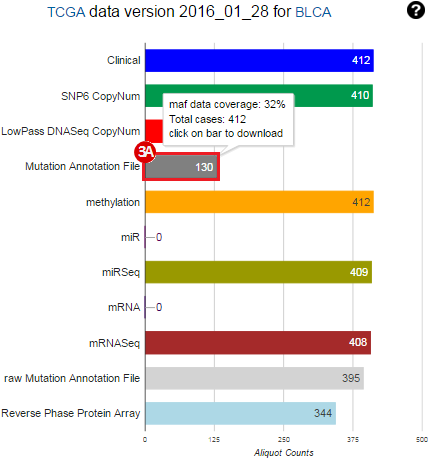
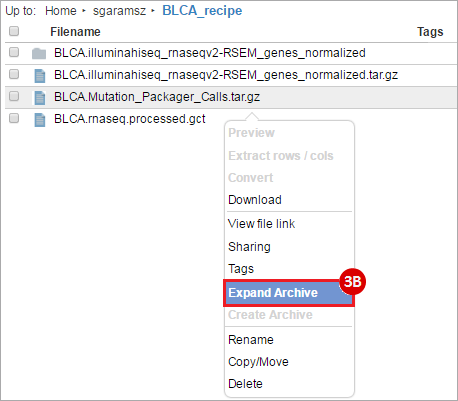
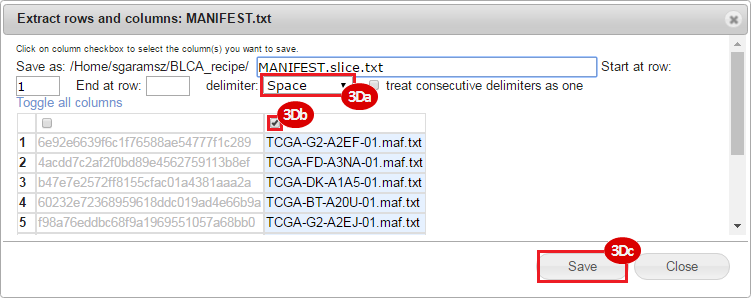
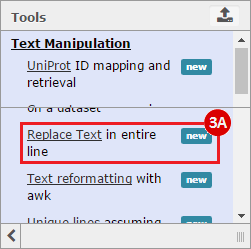
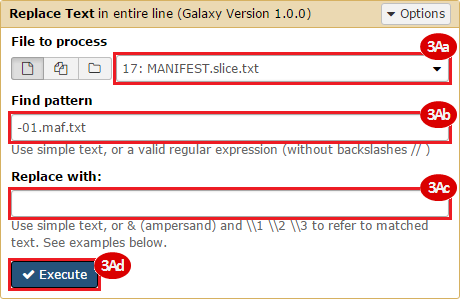
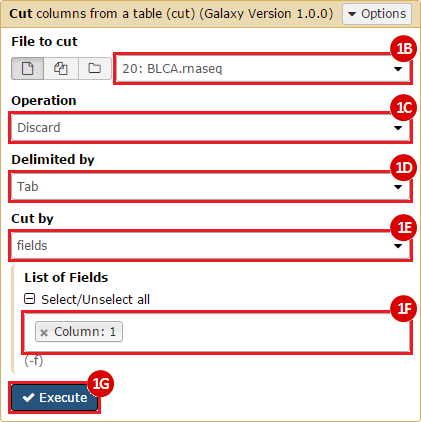
BLCA.Mutation_Packager_Calls.tar.gz: This is a zipped archive of mutation annotation files (MAFs) for all bladder cancer samples with mutations. Specifically, we will only be using the MANIFEST.txt file within this zipped archive, which just lists the samples with MAFs.

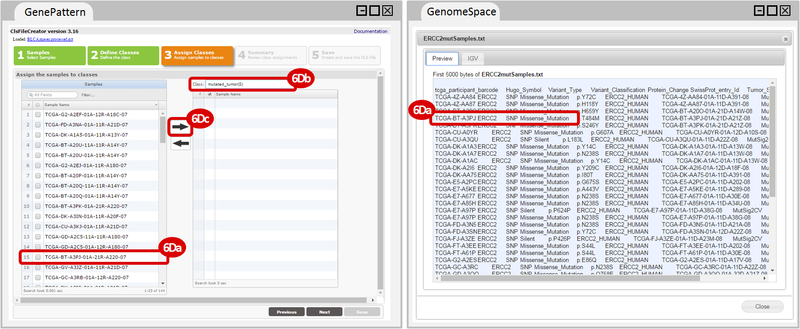
ERCC2mutSamples.txt: This text file lists the bladder cancer samples that have mutations in the ERCC2 gene. This file lists the specific type of mutation that occurs in the sample and whether it causes a missense or silent mutation of the protein product. This file also contains samples which do not have RNA-seq data, and must be filtered out.
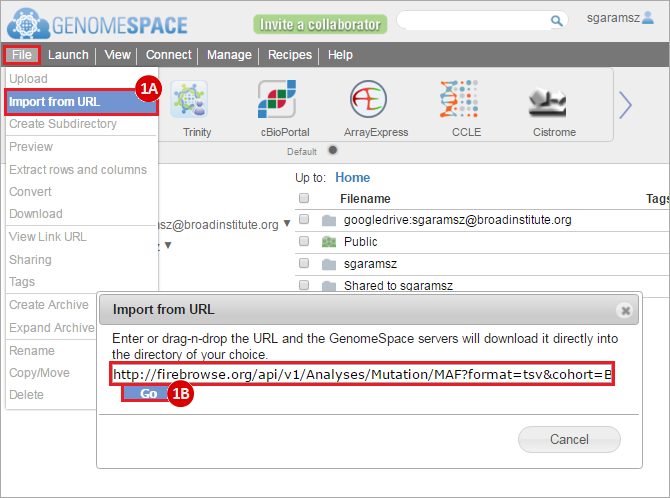
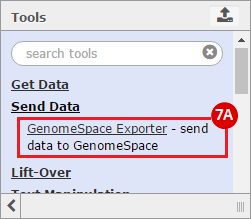
Outputs

This purpose of this recipe is to filter an RNA-seq dataset of bladder cancer samples, in order to find samples which have mutations in the ERCC2 gene, and compare them against samples that do not have these mutations. The output of this recipe will be a filtered GCT file (BLCA.rnaseq.processed.gct), and an accompanying CLS file (BLCA.rnaseq.processed.cls).

Recipe steps

  • FireBrowse
    1. Obtain the three input files from FireBrowse
  • GenomeSpace
    1. Upload and un-zip data in GenomeSpace
  • Galaxy
    1. Transfer the RNA-seq and MAF data files from GenomeSpace to Galaxy
    2. Process the RNA-seq file
    3. Identify RNA-seq samples that have MAF annotations by overlapping files
    4. Re-process the filtered RNA-seq data into a new file
  • GenomeSpace
    1. Convert the processed RNA-seq file into a GCT file
  • GenePattern
    1. Create a CLS file using the list of ERCC2-mutated samples

  1. Launch FireBrowse from GenomeSpace by clicking on the FireBrowse icon in the tool bar.
  2. Download the RNA-seq data file:
    1. Under SELECT COHORT, choose BLCA.

    2. In the barchart of samples, click mRNASeq (dark red bar). This will open a window called BLCA mRNASeq Archives.
    3. Click on Send To.
    4. Select illuminahiseq_rnaseqv2-RSEM_genes_normalized.
    5. Click the GenomeSpace Upload button, which will open the GenomeSpace upload/download manager.
    6. Choose a directory to save the file in. Click Submit to send the data to GenomeSpace. This will create a new archived file in your GenomeSpace account, called gdac.broadinstitute.org_BLCA.Merge_rnaseqv2_...[date/time]...tar.gz. Once the upload is complete, close the data manager window and the BLCA mRNASeq Archives popup window.
  3. Download the MAF annotation file:
    1. In the the barchart of samples, click Mutation Annotation File (grey bar). This will open a window called BLCA MAF Archives.
    2. Click on Send To.
    3. Select Mutation_Packager_Calls.
    4. Click the GenomeSpace Upload button, which will open the GenomeSpace upload/download manager.
    5. Choose a directory to save the file in. Click Submit to send the data to GenomeSpace. This will create a new archived file in your GenomeSpace account, called gdac.broadinstitute.org_BLCA.Mutation_Packager_Calls...[date/time]...tar.gz. Once the upload is complete, close the data manager window and the BLCA MAF Archives popup window.
  4. Download the list of BLCA samples with ERCC2 mutations.
    1. Click on the WEB-API link in the navigation menu.
    2. Click Analyses: Fine grained retrieval of analysis pipeline results.
    3. Click GET /Analyses/Mutation/MAF.
    4. Change the following parameters:
      1. format: tsv
      2. cohort: BLCA
      3. gene: ERCC2
    5. Click Perform Query. This will return several results, such as the "Request URL", "Response Body", "Response Code", and "Response Headers".
    6. Under the Request URL section, copy the URL.

      We will need this URL in the next step to upload the data to GenomeSpace. Make sure not to close the FireBrowse window until you have successfully uploaded the data to GenomeSpace.
  1. Upload the list of BLCA samples with ERCC2 mutations to GenomeSpace.
    1. In GenomeSpace navigate to File > Import from URL.
    2. Paste the URL from FireBrowse into the box, then click Go. This will open the GenomeSpace upload/download manager.

    3. Choose a directory and file name for the file (e.g., ERCC2mutSamples.txt).
    4. Click Submit to send the data to GenomeSpace.
  2. Un-zip the BLCA RNA-seq dataset.
    1. Right-click on the gdac.broadinstitute.org_BLCA.Merge_rnaseqv2_...[date/time]...tar.gz file.
    2. Choose Expand Archive. Give the unzipped folder an easy to remember name, e.g. "BLCA_RNAseq". Then click Expand Archive. This should create a new folder, BLCA_RNAseq.
    3. Navigate through the subfolders in BLCA_RNAseq until you find the RSEM file, BLCA.rnaseqv2__illuminahiseq_rnaseqv2__unc_edu__Level_3__RSEM_genes_normalized__data.data.txt. This is the file we will be working with. Feel free to copy this file to a different part of your directory, or to rename the file.
  3. Un-zip and process the BLCA MAF dataset.
    1. In GenomeSpace, right-click on the gdac.broadinstitute.org_BLCA.Mutation_Packager_Calls...[date/time]...tar.gz file.
    2. Choose Expand Archive. Give the unzipped folder an easy to remember name, e.g. "BLCA_MAF". Then click Expand Archive. This should create a new folder, BLCA_MAF.
    3. Navigate through the subfolders in BLCA_MAF until you find a MANIFEST.txt file.
    4. Right-click the MANIFEST.txt file, and choose Extract rows / cols. Change the following parameters:
      1. delimiter: Space
      2. Click the check-box above the second column. This should select all the MAF filenames (e.g. "TCGA-G2-A2EF-01.maf.txt").
      3. Click Save. The resulting file should be called MANIFEST.slice.txt.
  1. Upload the RNA-Seq file to Galaxy.
    1. Launch Galaxy by clicking on the Galaxy icon in GenomeSpace.
    2. Navigate to Get Data > GenomeSpace import.

    3. Navigate through your GenomeSpace directories until you find the RSEM file, BLCA.rnaseqv2__illuminahiseq_rnaseqv2__unc_edu__Level_3__RSEM_genes_normalized__data.data.txt.
    4. Click Send to Galaxy.
    5. When the dataset has been uploaded, click the pencil icon ().
    6. Click on the Datatype column, then change the following parameters:
      1. New Type: tabular
      2. Click Save.
    7. Click on the Attributes column, and change the following parameters:
      1. Name: BLCA.rnaseq
      2. Click Save.
  2. Upload the MAF file, MANIFEST.slice.txt, to Galaxy.
    1. Navigate to Get Data > GenomeSpace import.
    2. Navigate through your GenomeSpace directories until you find the MANIFEST.slice.txt file. Select it.
    3. Click Send to Galaxy.
  3. Remove extraneous data from the MANIFEST.slice.txt file.
    1. Navigate to Text Manipulation > Replace Text (in entire line). Change the following parameters:
      1. file to process: GenomeSpace import on [Manifest.slice.txt]
      2. Find pattern: -01.maf.txt
      3. Replace with: (leave empty)
      4. Click Execute.
    2. Once the job is finished running, click on the pencil icon () and navigate to the Attributes section. Change the following parameters:
      1. Name: MAF Sample IDs.
      2. Click Save.
    3. Click on the Datatype column, then change the following parameters:
      1. New Type: tabular
      2. Click Save.
  1. Remove the first column of gene IDs from the RNA-seq data.
    1. Navigate to Text Manipulation > Cut columns from a table (cut). Change the following parameters:
      NOTE: There are two versions of a 'cut' tool in Galaxy. Please check the screenshots and make sure that the parameters of the tools match.

    2. file to cut: [BLCA.rnaseq]
    3. Operation: Discard
    4. Delimited by: Tab
    5. Cut by: fields
    6. List of Fields: click on the box and select Column: 1 from the drop-down menu.
    7. Click Execute.
  2. Transpose the RNA-seq data (convert the rows to columns, and the columns to rows).
    1. Navigate to Datamash > Transpose. Change the following parameters:
    2. Input tabular dataset: Cut on [BLCA.rnaseq]
    3. Click Execute.
  3. Remove extraneous columns from the data.
    1. Navigate to Text Manipulation > Cut columns from a table (cut). Change the following parameters:
      NOTE: There are two versions of a 'cut' tool in Galaxy. Please check the screenshots and make sure that the parameters of the tools match.
    2. file to cut: Tranpose on [Cut on BLCA.rnaseq]
    3. Operation: Discard
    4. Delimited by: Tab
    5. Cut by: fields
    6. List of Fields: click on the box and select Column: 2 from the drop-down menu.
    7. Click Execute.
    8. Once the job is finished running, click on the pencil icon () and navigate to the Attributes section. Change the following parameters:
      1. Name: BLCA.rnaseq Data.
      2. Click Save.
  1. Cut out the list of sample IDs from the RNA-seq file for processing.
    1. Navigate to Text Manipulation > Cut columns from a table (cut). Change the following parameters:
      NOTE: There are two versions of a 'cut' tool in Galaxy. Please check the screenshots and make sure that the parameters of the tools match.

    2. file to cut: [BLCA.rnaseq Data]
    3. Operation: Keep
    4. Delimited by: Tab
    5. Cut by: fields
    6. List of Fields: click on the box and select Column: 1 from the drop-down menu.
    7. Click Execute.
  2. Trim extraneous text from the sample IDs (obtained from the RNA-seq file).
    1. Navigate to Text Manipulation > Trim. Change the following parameters:
    2. this dataset: Cut on [BLCA.rnaseq Data]
    3. Trim this column only: 0
    4. Trim from the beginning up to this position: 1
    5. Remove everything from this position to the end: -16
    6. Is input data in fastq format?: No
    7. Click Execute.
  3. Combine the simplified sample IDs with the processed RNA-seq dataset.
    1. Navigate to Text Manipulation > Paste. Change the following parameters:
    2. Paste: Trim on [Cut on BLCA.rnaseq Data]
    3. and: [BLCA.rnaseq Data]
    4. Delimit by: Tab
    5. Click Execute.
    6. Once the job is finished running, click on the pencil icon () and navigate to the Attributes column. Change the following parameters:
      1. Name: BLCA.rnaseq Data, combined IDs
      2. Click Save.
  4. Find the overlap of IDs between the RNA-seq sample IDs and the MAF annotation sample IDs.
    1. Navigate to Join, Subtract and Group > Join two Datasets. Change the following parameters:
    2. Join: [MAF Sample IDs]
    3. using column: Column: 1
    4. with: [BLCA.rnaseq Data, combined IDs]
    5. and column: Column: 1
    6. Keep lines of first input that do not join with second input: No
    7. Keep lines of first input that are incomplete: No
    8. Fill empty columns: No
    9. Click Execute.
    10. Once the job is finished running, click on the pencil icon () and navigate to the Attributes column. Change the following parameters:
      1. Name: BLCA.rnaseq Data, filtered
      2. Click Save.
    11. Click on the Datatype column, then change the following parameters:
      1. New Type: tabular
      2. Click Save.
  1. Remove the extraneous column from the BLCA.rnaseq Data, filtered file.
    1. Navigate to Text Manipulation > Cut columns from a table (cut). Change the following parameters:
      NOTE: There are two versions of a 'cut' tool in Galaxy. Please check the screenshots and make sure that the parameters of the tools match.

    2. File to cut: [BLCA.rnaseq Data, filtered]
    3. Operation: Discard
    4. Delimited by: Tab
    5. Cut by: fields
    6. List of fields: click on the box and select Column: 1 from the drop-down menu. Click again to select Column: 2 from the drop-down menu.
    7. Click Execute.
  2. Re-transpose the RNA-seq data to its original form (convert the rows to columns, and the columns to rows).
    1. Navigate to Datamash > Transpose. Change the following parameters:
    2. Input tabular dataset: Cut on [BLCA.rnaseq Data, filtered]
    3. Click Execute.
  3. Obtain the first column of the original file, the gene IDs.
    1. Navigate to Text Manipulation > Cut columns from a table (cut). Change the following parameters:
      NOTE: There are two versions of a 'cut' tool in Galaxy. Please check the screenshots and make sure that the parameters of the tools match.
    2. file to cut: [BLCA.rnaseq]
    3. Operation: Keep
    4. Delimited by: Tab
    5. Cut by: fields
    6. List of Fields: click on the box and select Column: 1 from the drop-down menu.
    7. Click Execute.
    8. Once the job is finished running, click on the pencil icon () and navigate to the Attributes section. Change the following parameters:
      1. ​Name: BLCA.rnaseq Gene IDs
      2. Click Save.
  4. Remove unnecessary information from the column of gene IDs.
    1. Navigate to Text Manipulation > Remove beginning. Change the following parameters:
    2. Remove first: 1
    3. from: [BLCA.rnaseq Gene IDs]
    4. Click Execute.
  5. Add a descriptor column to the gene IDs file.
    1. Navigate to Text Manipulation > Add column. Change the following parameters:
    2. Add this value: No description
    3. to Dataset: Remove beginning on [BLCA.rnaseq Gene IDs]
    4. Iterate?: NO
    5. Click Execute.
  6. Combine the gene IDs and the RNA-seq dataset together.
    1. Navigate to Text Manipulation > Paste. Change the following parameters:
    2. Paste: Add column on [Remove beginning on [BLCA.rnaseq Gene IDs]]
    3. and: Transpose on [Cut on [BLCA.rnaseq Data, filtered]]
    4. Delimit by: Tab
    5. Click Execute.
    6. Once the job is finished running, click on the pencil icon () and navigate to the Attributes section. Change the following parameters:
      1. Name: BLCA.rnaseq Final
      2. Click Save.
  7. Send data back to GenomeSpace.
    1. Navigate to Send Data > GenomeSpace Exporter. Change the following parameters:
    2. Send this dataset to GenomeSpace: [BLCA.rnaseq Final]
    3. Choose Target Directory: select a directory to save the file to
    4. Filename: give the file a name, e.g. BLCA.rnaseq.processed.tab. Make sure to use the .tab extension when saving the file.
    5. Click Execute.
  1. Turn the RNA-seq file into a GCT file.
    1. In GenomeSpace, right-click on the BLCA.rnaseq.processed.tab file.
    2. Choose Convert.

    3. Under Convert to: choose GCT.
    4. Click Convert on Server. The output file should be BLCA.rnaseq.processed.gct.
  1. Launch GenePattern by clicking on the GenePattern icon in the toolbar.
  2. In the Modules section, search for the ClsFileCreator module. Click the ClsFileCreator module to load the module.

  3. Change to the GenomeSpace tab to be able to access your files in GenomeSpace. Change the following parameters:
    1. input fileBLCA.rnaseq.processed.gct.
    2. Click Run. This will launch a visualizer which will walk you through the CLS file creation process.
  4. Add all the sample IDs to your CLS file:
    1. Click on the Samples tab.
    2. Make sure all samples are highlighted by clicking the Check All button.
    3. Scroll down and click Next.
  5. Under the Define Classes tab, change the following parameters:
    1. Define four classes; for each class, enter the name in the Enter class name box, then click the Add class button.
      • mutated_normal: this is ERCC2 mutated, solid tissue normal (Sample Code: 11)
      • mutated_tumor: this is ERCC2 mutated, primary solid tumor (Sample Code: 01)
      • wildtype_normal: this is non-mutated, solid tissue normal (Sample Code: 11)
      • wildtype_tumor: this is non-mutated, primary solid tumor (Sample Code: 01)
    2. Once you have added these classes, scroll down and click Next.
  6. Assign sample IDs to the classes.
    1. In a separate browser window, open GenomeSpace. Navigate to the location of the ERCC2mutSamples.txt file.
    2. Right-click on the ERCC2mutSamples.txt file, then choose Preview. This will allow you to view the file. Keep this window open, in order to be able to reference the contents of the ERCC2mutSamples.txt file in later steps.
       
    3. Return to the browser window containing the view of GenePattern's CLSFileCreator module.
    4. Under the Assign Classes tab, assign each sample ID to a class.
      1. Look at each sample ID in the ERCC2mutSamples.txt file (in GenomeSpace) and determine its ID (e.g. "TCGA-4Z-AA84-01A-11D-A391-08"). Next, compare this to the CLSFileCreator window (in GenePattern), and look for the same IDs.
      2. Make sure the Class: parameter is set to the appropriate class, based on the following criteria:
        • mutated_normal: samples with sample class "11" and "missense mutation" (under "Variant_classification")
        • mutated_tumor: samples with sample class "01" and "missense mutation" (under "Variant_classification")
        • wildtype_normal: all remaining samples with sample class "11"
        • wildtype_tumor: samples with sample class "01" and "silent mutation" (under "Variant_classification"), and all remaining samples with sample class "01" that are not assigned to mutated_tumor
      3. If you have a matching ID and the correct Class: chosen, assign the sample ID to the class by clicking on the arrow.
    5. Once you have assigned all samples to a class, scroll down and click Next.

      Note: There are a total of 43 lines in the ERCC2mutSamples.txt file, including 1 metadata line. The remaining 42 lines allow us to directly identify 2 mutated_normal samples, 16 mutated_tumor samples, and 2 wildtype_tumor samples with silent mutations. The 13 wildtype_normal samples are identified by their Sample Code (e.g. "11") which remains once the previous samples are removed from the list. The remaining 111 wildtype_tumor samples are identified by being left over after all remaining previously listed samples are classified.
  7. Review the information in the Summary section. You should have the following assignments:Once you have reviewed everything, scroll down and click Next.
    • mutated_normal: 2
    • mutated_tumor: 16
    • wildtype_normal: 13
    • wildtype_tumor: 113
  8. Under the Save tab, change the following parameters:
    1. Enter file name: Keep the filename that was generated, BLCA.rnaseq.processed.cls
    2. Select the Save file to GenePattern Files Tab button.
    3. Click the Select directory button.
    4. On the Select Directory from Files pop-up, click on the directory you want to upload the file to.
    5. Click OK.
    6. On the Save tab, click Save to save the file to GenePattern.


(Optional) Save the file back to GenomeSpace.

  1. Navigate to your GenePattern Files tab.
  2. Click on the generated file, BLCA.rnaseq.processed.cls, and choose Save to GenomeSpace.
  3. Choose a directory to save the file to, and click Save.

Results Interpretation

The completion of this recipe should result in two complementary files: BLCA.rnaseq.processed.gct, and the accompanying BLCA.rnaseq.processed.cls. The GCT file will contain gene-level RSEM values for the BLCA samples; the CLS file will define the phenotype labels (e.g. normal tissue vs. tumor) for each sample in the GCT file.

These two files can be used together to complete other types of analyses. In particular, to recapitulate the research shown by Kim et al. (Nature Genetics, 2016), the best course of action is to compare the RSEM values for each of the phenotypes, in order to identify what the overall gene expression profile looks like for samples that have ERCC2 mutations. By comparing normal and tumor tissues that do or do not have the ERCC2 mutations, a mutational signature can be determined.

Using the processed, normalized gene-level expression data, there are several follow-up analyses to consider:


Submit a Comment

History